Curated with aloha by
Ted Mooney, P.E. RET

The authoritative public forum
for Metal Finishing 1989-2025

-----
Hobby Color Anodizing in Home Shop
for Shops, Specifiers & Engineers
avail from eBay, AbeBooks, or Amazon
avail from eBay, AbeBooks, or Amazon
avail from eBay, AbeBooks, or Amazon
avail from eBay, AbeBooks, or Amazon
avail from eBay, AbeBooks or Amazon
(as an Amazon Associate & eBay Partner, we earn from qualifying purchases)
Q. Hi everyone, I'm a hobbyist and pretty new to it at that, so I'm still struggling with a few of the finer details. I'm comfortable with most of the chemistry involved but my lack of experience or familiarity with it leaves me wondering about exact applications such as mine.
I'm hoping to anodize a paintball gun I picked up pretty cheap. It was pretty scratched up and generally just ugly, so I decided to clean it up and paint it. I'm sure you can guess how well that went because now I'm looking at anodizing, haha.
On to my point, I keep seeing that after dyeing my anodized substrate I need to seal it. My initial research gave me the impression that this was simply a boiling water (distilled) bath, but now I keep seeing things like Nickel Acetate and other salt baths. I'm gathering that these are engineered toward better corrosion resistance, but I'm far more concerned with abrasion and UV resistance. Not so much that I'm trying to make some invincible finish, but this paintball gun won't see corrosion, just UV and abrasion. So which sealing solution will best suit this concern?
And if anyone has links to well researched, trustworthy articles about common mistakes new guys make, I'd always appreciate those.
- Charlottesville, Virginia
December 20, 2021
A. Hi Cory. I could be wrong, but I don't think the choice of sealing method will have much effect on the UV resistance; I think that will depend more upon stable UV-resistant dyes. But it probably is true that nickel acetate sealing is easier on the dyes than subjecting them to boiling water, so nickel acetate is pretty much the 'standard' for color anodizing.
Luck & Regards,

Ted Mooney, P.E. RET
Striving to live Aloha
finishing.com - Pine Beach, New Jersey
December 2021
|
|
A. Cory - Green Mountain Falls, Colorado December 23, 2021 Try chemical oxidation of aluminium, ferric citrate [affil links] based process (according to patent USPT 4,212,685). No need for expensive equipment and dangerous chemicals ... Hope it helps and good luck! Goran Budija- Cerovski vrh Croatia December 23, 2021 |
⇩ Related postings, oldest first ⇩
Q. I am looking for information on anodizing that would include a "How to" and a source for getting the chemicals, dyes and other equipment that is necessary to do anodizing of small parts. I am just wanting to do this as a hobby. Any help would be welcome. Thanks
Mark S [last name deleted for privacy by Editor]- Lincoln Alabama
1999
A. Hi Mark.
The steps in the kind of aluminum anodizing that you are referring to are usually:
- Cleaning (alkaline non-etching cleaner)
- Etching (to provide a matte finish with at least a little fingerprinting resistance)
- De-Smutting (aluminum alloys contain other materials like silicon and copper that can't be anodized, and which discolor the coating; so you try to dissolve them away from the surface)
- Anodizing (creating a honeycomb layer of porous aluminum oxide on the surface by anodic electrification in a solution of dilute sulfuric acid)
- Dyeing (filling the honeycomb with dye)
- Sealing (closing off the pores to retain the dye and prevent soils from filling the honeycomb)
Aluminum How-To
"Chromating - Anodizing - Hardcoating"
by Robert Probert
Also available in Spanish
You'll love this book. Finishing.com has sold almost a thousand copies without a single return request :-)
Rinsing is required between each step, and sometimes (depending on particular parts) additional steps like neutralization with bicarbonate or flushing with dilute nitric acid are required.
Probert's book is a good introduction to the art and science. There are companies which serve the hobbyist market, and who can probably be found by googling terms like "hobby anodizing".
Please try to understand chemical safety, including the need for goggles, gloves, and ventilation; and adopt a good environmental attitude before starting. Please don't be tempted to sell your services or your anodized parts, as there are burdensome environmental regulations which probably don't apply to a hobbyist, but do apply to a small business. Good luck.
Regards,

Ted Mooney, P.E.
Striving to live Aloha
finishing.com - Pine Beach, New Jersey
Q. Looking for manufacturer of anodizing equipment and also for training and how to sources
Milton D[last name deleted for privacy by Editor] - Killian, Louisiana
2000
----
Ed. note: For anodizing equipment, please click the "Capital Equipment" button at the bottom of the page. For training and how-to, please click the "Consult'g, Train'g, Software" button. Or try google; sorry we can't suggest brands or sources here ( huh? why?)
2000
Q. I am also looking into anodizing as a hobby and form of art and would like to know how I would be able to start it. Interested in any helpful hints. Thanks John
John M [last name deleted for privacy by Editor]- Era Texas
A. I have been doing much research on anodizing for a school project. The most useful source of information I found was: "ANODIC OXIDATION OF ALUMINUM AND ITS ALLOYS" V.F Henley, 1982 .
I built a 6 amp 12 VDC anodizer out of a rectifier pulled from old equipment and a 120 VAC 10 amp motor speed control. It works very well for areas under 3 decimeters^2.
-Ithaca, New York, US
2001
Multiple threads merged: please forgive chronology errors and repetition 🙂
Q. I am more into wood, and make walking sticks [not to sell] out of many unique things, shapes, and materials, handle shapes and materials, etc. Obviously old ski poles are the ultimate in material and with additions and accoutrements, would make many an interesting result. Salvage is half the fun, and good aluminum or alloy ones abound at garage sales, hence scratched and worn. Most, or many are originally colored with something that is not a coating, without professionally anodizing, or whatever, is there something or someway to color them anew?
Roger Newmanhobbyist consultant but not in metal, rubber. - Roscoe, Illinois
2003
A. Hi Roger. The poles were anodized, and if you don't want to paint them, but to get a finish similar to the original, you would need to strip the old anodizing, re-anodize, dye, and seal. Some hobbyists do anodizing themselves, it's certainly not impossible -- but ski poles would require process tanks that are larger than most hobbyists would want to fool with. Good luck.

Ted Mooney, P.E.
Striving to live Aloha
finishing.com - Pine Beach, New Jersey
2003
Q. I'm an Amateur hobbyist anodizing some Al parts in 6061 and 2024 using a kit. Just experimenting now but having problems keeping the dye on the part even after sealing in boiling water for 20 min. Very frustrating to wipe off color after a 2 hour process :-(
I'm thinking the temperatures are REALLY critical and I'm a little off or I'm not leaving the parts in the anodize tank long enough. The continuity test proves they do anodize but maybe the oxide isn't growing thick enough?
The Room Temp sealant doesn't seem to work as well as boiling either. Here is my setup: Power = 2/40/200 Amp 12V Charger. Desmut = Ferric Acid/sulfuric Acid solution (1-3 min. @ 90 °F) Anodize = 2:1 Water:battery acid ⇦ this on eBay or Amazon [affil links] w/2 8x8in. lead Cathodes leaving parts (~117 sq. in. surface area) in for 45-60min. Dyeing = 2 oz. Dye to 1 Gal. water (15min. @ ~140deg. F) Sealing = Either Low Temp sealant 5-10 min. @ 90 °F -OR- Boil on stove for 20 min.
Hanel Escobal- W.P.B., FL, USA
2003
2004
A. Hello Hanel. If the dye wipes off, it must be just on the surface, it can't be in the pores of the aluminum oxide anodizing layer because rubbing off wouldn't be possible.
So my first has to be that for some reason you're not even anodizing :-(

Ted Mooney, P.E.
Striving to live Aloha
finishing.com - Pine Beach, New Jersey
Q. I would like to anodize a set of aluminum grip panels on a USPSA Open class racegun. The gun has a red C-More dot sight on a hard chromed slide/frame. I would like to blue anodize these grip panels to give it a "Stars and Stripes" theme. The obstacle is that there are no avenues for this process anywhere near my vicinity. I was told that I could do this in my shop but I'm rather skeptical about the outcome and overall quality of the finished product. Any help would be greatly appreciated!
Tom HamanGUNSMITHING - Coralville, Iowa, USA
2004
2004
A. Sure you can do it in your shop - just as soon as you acquire a few hundred hours of knowledge and spend a few tens of thousands of dollars, and get the necessary environmental permits.
Seriously - a quick web search will lead you to an anodizing shop you can UPS your parts to and get them done right.

Jeffrey Holmes, CEF
Spartanburg, South Carolina
A. Hi Tom. If you are a hobbyist rather than a business, you may not need permits, although you'll need environmental & safety knowledge. Hobby plating suppliers will sell you what you need for hobby anodizing ... but as a gunsmith like yourself knows, there's a lot more to becoming an artist than just buying a paintbrush :-)
Luck & Regards,

Ted Mooney, P.E.
Striving to live Aloha
finishing.com - Pine Beach, New Jersey
A. It's not too hard to do it yourself ... as already noted it's the environmental issues that can hinder you. I have a basic "garage" style setup that cost me under $500 to setup ... and yes it took me many many hours of research to get the results I wanted. If you want to outsource the job maybe try looking through paintball magazines/websites. They are used to doing small batches and can be fairly affordable.
Do you have any idea which aluminum alloy it is? Some alloys anodize much much better that others.
Jason Aube- Flint, Michigan
2004
A. Here's a web site with tons of helpful info and chemicals to get you started. They also have a Yahoo forum that is full of lots of great people eager to help, as well as great info: www.focuser.com/anodize.html
- Lake Havasu City, Arizona, USA
2004
----
Ed. note: That link is now broken. Indeed nearly all links break quickly, which is at odds with our efforts here since 1995 to build a durable reference site ...
So we don't much like links, but we ask that if they are offered, they include at least the title of the article and a very brief abstract so we have some chance of re-finding them, and they not just be bandwidth & time wasters for our readers. The other problem with links is that for us to find which links across our large site have been sold to malware sites or link farms is a major problem :-(
Thanks!
Q. How does one "dye" the anodized aluminum?
Regina Mortlandhobbyist - Duxbury, Massachusetts
2005
The Sulfuric Acid Process"
by David LaPlantz
on AbeBooks
or eBay or
Amazon
(affil links)
A. Hi Regina. You cannot dye objects which you have found that are anodized aluminum, if that is the question.
Rather, the anodizing and dyeing are intimately related steps in an integrated process. The aluminum is prepped, anodized, dyed (or not), and sealed. Once the aluminum has been sealed it can absorb no dye. You might find our "Introduction to Anodizing" helpful.
I am not a hobbyist and have not reviewed the book Artists Anodizing Aluminum, but it sounds useful to hobbyists.

Ted Mooney, P.E.
Striving to live Aloha
finishing.com - Pine Beach, New Jersey
Q. Hi,
I started experimenting some hobby anodizing at home. I started off using battery acid (those in the car-mart), aluminium foil leads and pumping a 12V at 300mA through the solution.
I saw very tiny bubbles frizzing off the leads and let it go on for 30 mins. After that, I soak the leads in fabric cold fabric dye. I realised that the aluminium leads does not absorb the colour.
The aluminium lead is still frizzing off with bubbles when I off the power supply. Can anyone advise why my aluminium lead does not absorb the fabric dye?
hobbyist - Singapore
2005
A. Try running the part through longer...maybe an hour (the thicker the anodize the deeper the color).
Heat up the dye to about 130-140 °F; at room temp the dye doesn't penetrate the anodize well. Soak the anodized part in the dye for a good 15 mins.
Perhaps try getting some chunks of 6061 to anodize, that alloy anodizes well and is very common.
Your power supply may not be what is needed. I don't know the specifications, and the little anodizing I've done I used a battery charger
⇦ this on
eBay or
Amazon [affil links]
and the anodize drew what was needed.
- Flint, Michigan
2005
Q. Dear sir,
I would like to ask, can a powder coat powder be mixed in water and used as dye for anodising aluminum? Or is there other suitable Dyes that can be used other than anodising dye?
Thanks for you answer.
home anodising - manila,Philippines
May 29, 2015
July 2015
A. Hi Mario. Powder coating powder is plastic and it will not dissolve in water. And the particles are far too big to enter the anodizing pores anyway. But if you are just playing around, trying to get familiar with hobby anodizing, then fabric dye can be used (although it's durability is questionable). Good luck.
Regards,

Ted Mooney, P.E. RET
Striving to live Aloha
finishing.com - Pine Beach, New Jersey
Are anodizing tank heaters essential?
Q. I recently ordered most of the stuff to do aluminum anodizing from a hobby plating vendor. I thought I had gotten everything until I saw that they use tank heaters in their how-to videos. They have a 300 watt ceramic heater in the degreaser tank, a 300 watt heater in the deoxidizer / desmut tank, and then a heater to basically keep the anodize bath at 72 degrees.
I do have a hot plate single stove eye to heat the metal dye tanks, but had not gotten the others. How important are they?
Also, can the lead GP plates be left in the anodize bath or will I have to pull them out and put them in every time I use the system?
- USA
October 18, 2017
December 22, 2017
Q. I have read many threads on how to fix anodizing problems, but I have come to understand that a solution that works for them might not work for me. I have detailed my anodizing process hoping someone can help improve my process. Any advice on how to improve my anodizing process for relatively cheap would be deeply appreciated.
Goal
The result I am trying to achieve is a glossy/bright dye finish. I am anodizing Alum 5005 14 gauge Approx. 8 Square foot and Alum 6063 extrusion approx. 10 Square foot. I want to make custom business signs (outside signs). I choose these two materials for two reasons: they anodize well and can be used for structural. If there are better alloys I am open for suggestions.
Problems
I have a discoloration problem:
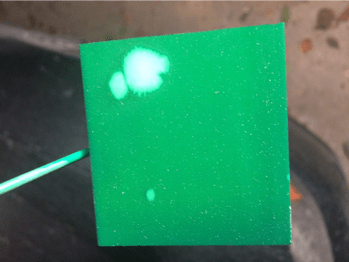
Fig 1: Before I used a rag to wipe the excess powder
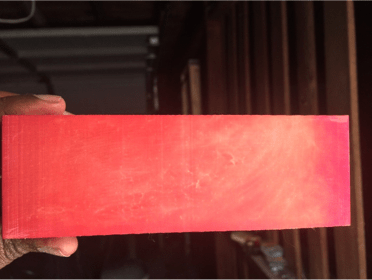
Fig 5: before I wipe the extra powder away
Another problem I have is when I am done dye anodizing and sealing the part, there is powder left on the part:
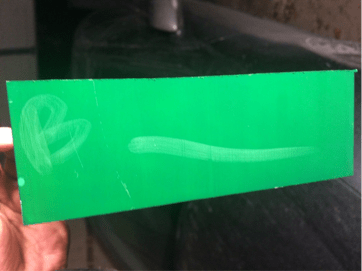
Fig 3 before wiping the part
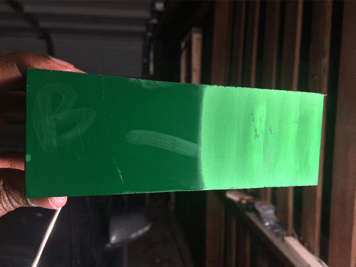
Fig 4: wiping half the part
When I ran my finger across the part, the dye powder appears on my finger and a finger mark appears on the part.
I am a college student and I can't afford most of the testing equipment (example: salt spray testing). Is there an affordable way I can test my parts for anodization and sealing?
Trial material (I can't afford to test on a large piece, so I am using smaller pieces hoping to replicate on larger pieces once I get the formula down)
Aluminum 6063 Extruded 6" X 2" Rectangle 2.6 Square FT. I haven't done any 5005 because none of my local suppliers carry it in small sizes.
The process
(I followed this process: gordsgarage.wordpress.com/tag/home-anodizing/)
I begin by prepping the part I use a polishing grinder to get a mirror like finish (This process takes a long time, are there any other faster methods?)
I dampen a cloth in acetone
⇦ this on
eBay
or
Amazon
[affil links] Warning! highly Flammable!
and I rub the wax off from the polishing process.
I place the part in a degreaser that has been heated up to 160 °F for 5 min.
I use a spray bottle with distilled water to rinse the part (I will have to switch to a bath rinse on big parts)
At this step I use aluminum de-oxidizer & desmut to etch the part at 72 °F for 5 min. I think I will stop this since I did a run without it and the parts were much brighter/glossier.
Anodizing the part
I mix 4.5 distilled water and 1.5 sulfuric acid (battery acid). For a 3:1 ratio
The cathode plates and anode are made from scrap aluminum I found laying around. I don't know the Alloy. I use 5356 TIG welding filler as my hanging wire.
I used the 720 rule anodizing calculator. My part is 2.6 square FT. The thickness I want is .8 mils and the current destiny I am using is 5 amp/square Ft. In my power supply I set the current at 13 Amp. voltage at 12.5 for 115 minutes.
I use a small aquarium pump for agitation. Unless coming really close to the bath you can't tell there is any agitation. Does this make a difference?
When I start anodizing the bath is at 71 °F. I noticed toward the end it had risen to 78 °F.
I use a spray bottle with distilled water to rinse down the part.
I place the part in the die solution which has been heated to 140 °F for 6 minutes.
I use a spray bottle with distilled water to rinse down the part.
I seal the part in boiling distilled water at >100°F. I use a stove so the temperature gets hotter and hotter for 30 to 45 min No temperature control see Fig 6)
Products I use
Polish: zephyrpro40.com/product/super-shine-x-polishing-kit/
Acid: www.oreillyauto.com/detail/super-start-4994/chemicals---fluids-16461/battery-chemicals-17661/battery-acid/5gal/4742476
Dye, Cleaner degreaser, and Desmut from a hobby plating supplier.
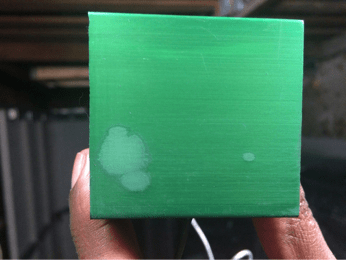
Fig 2: After I used a rag to wipe the excess powder
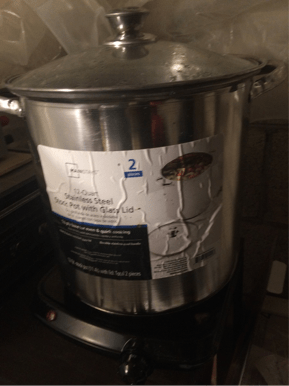
Fig 6: pot I use to heat up everything and seal the parts
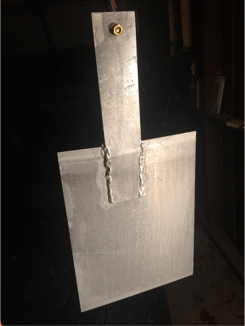
Fig 7: Cathode, I use 300 Amp car jumper cable to clamp on the brass bolt
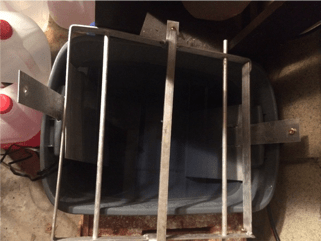
Fig 8: Anode rack and bath
- Reynoldsburg, Ohio
Problems with color consistency
February 17, 2018Q. Hello, first timer here. I have two questions I am hoping your communal wisdom can help with. I am attempting to anodize a rifle scope mount made from 6061 aluminum (type II - decorative). I have stripped the old anodized layer off, cleaned, degreased according to instructions I found on this forum. I am using lead sheets for cathodes at approximately a 3:1 ratio. The bath is 1 part distilled water 1 part sulfuric acid (battery acid solution). I am using 16 gauge aluminum wire to hang my parts. Power supply is running at 10 amps.
Long story short, I am seeing a vast difference in coloring between two identical parts. One turned out perfect (to my standards) and the other didn't take the dye as well. The procedures were identical. Any suggestions on where I can start troubleshooting? The dye is a hobbyist camo dye heated between 125-140 °F.
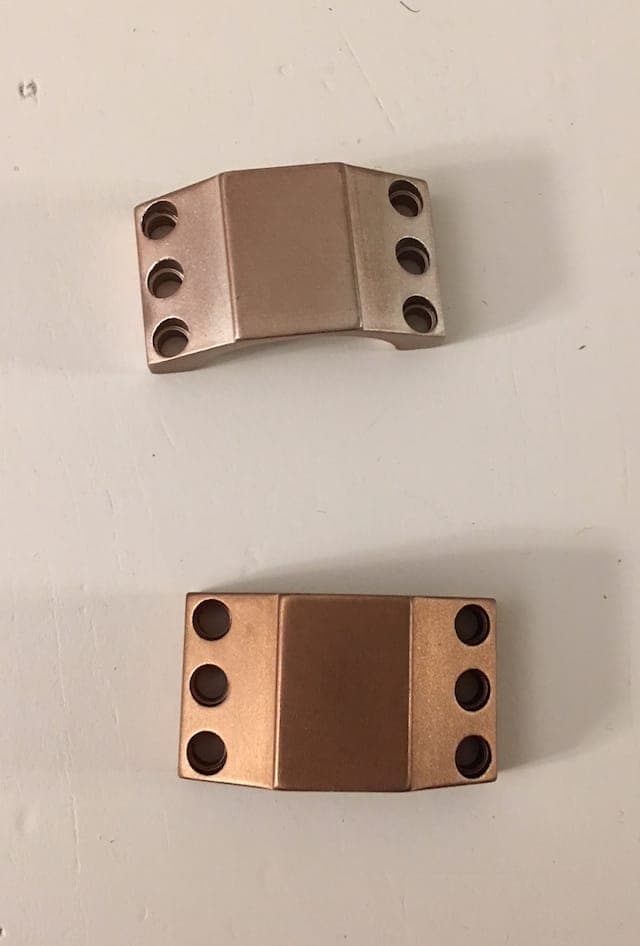
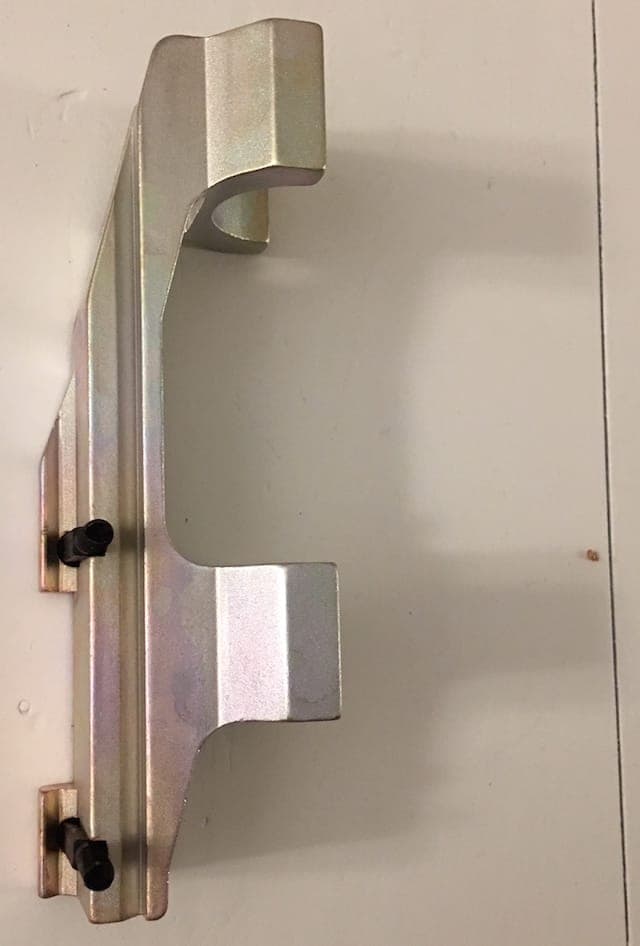
Secondly, the main part of the rifle scope mount has bolts permanently fixed to it. I am assuming they are steel. I have not been successful in anodizing this part. It actually came out of the dye bath with a rainbow hue. Pretty, but not what I am going for. Is there anything I can do anodize this properly or are the mounting screws killing my results? Please enlighten me
Thanks so much!
Hobbyist - Tacoma, Washington
A. Hi David. Despite your efforts towards consistency, I think the anodizing on the lower of the two pieces may be thicker and therefore able to accept more dye for a more saturated color. You are perhaps operating on the razor edge of minimum thickness for acceptable dying so the tiniest variation makes the parts different?
You cannot successfully anodize with steel parts attached because even if the acid doesn't destroy them, all of the current will flow to them. You have some limited chance of success if you are able to fully mask the steel. Try electricians tape, making sure there is absolutely no steel exposed. The faint rainbow look is probably diffraction coloration, meaning perhaps that you obtained an extremely thin (partial wavelength) anodized coating on the aluminum before its resistance exceeded the resistance of the steel screws and no more anodizing could take place. Good luck.
Regards,

Ted Mooney, P.E. RET
Striving to live Aloha
finishing.com - Pine Beach, New Jersey
February 2018
Q. Ted, thank you very much for your insight. In regards to the anodizing thickness consistency is it possible that the 16 gauge aluminum wire I am using is not a reliable connection? Would going to a 12 or 10 gauge help at all?
For the other part containing the bolts I will try masking and cross my fingers
Much appreciated and have a great day
- Tacoma, Washington
February 17, 2018
A. Hi Danny. I don't know your exact setup, or whether it's really part of your problem, but I'd probably use 10 gauge.
Although 12 gauge solid aluminum wiring is rated 15 Amps per strand, remember that this applies only to aluminum wire which was intended to be current-carrying wire (wire from which you strip the insulation). Other aluminum alloy wires intended to be used as baling wire or jewelry stringing wire, etc., probably carry significantly less current (even tiny amounts of alloying materials wreck havoc on current carrying ability).
Regards,

Ted Mooney, P.E. RET
Striving to live Aloha
finishing.com - Pine Beach, New Jersey
February 2018
Q, A, or Comment on THIS thread -or- Start a NEW Thread