Keeping an HVLP Spray Gun in Compliance with Regulations
By Ron Joseph of Ron Joseph & Associates, Inc.
The following situation was observed during the training program. A painter was using an HVLP spray gun that was fitted with an air pressure gauge at the handle, but he did not have a pressure gauge for the cap of the gun. Therefore, he did not know what his atomizing pressure was, nor could he have demonstrated compliance with an air pollution regulation, such as the Aerospace NESHAP which requires one to demonstrate that the pressure at the cap does not exceed 10 psig.
After his first coat, the painter was disappointed that he had applied too dry a coating. The pressure on the handle of the gun was 60 psi; and overspray flew in all directions.
He then lowered the pressure to 40 psi and stood no more than 6 inches from the surface. The finish improved but was still not wet enough. When he lowered the pressure at the handle to 35 psi, and moved to a gun-target distance of 4 inches, he finally got a wonderfully wet and uniform finish. Moreover, overspray decreased noticeably, transfer efficiency increased and now he could get more mileage from the high-priced polyurethane.
He arrived at these gun settings by trial and error, and at no time knew what his atomizing pressure was.
The benefits for lowering his atomizing pressure were:
Recommendation: The paint shop should own at least one air pressure gauge that can be fitted to the cap of an HVLP spray gun. Such gauges are pre-assembled to the air cap by the spray gun vendor and can be purchased at a nominal cost.
Another alternative is to make a cap/gauge assembly yourself. They take one of their air caps (one cap for each gun/fluid needle design) and drill a 1/4" hole through the cap. Tap a thread in the hole, and then attach a nipple to the cap. Thereafter attach any commercially available pressure gauge, usually 0-30 psig, to the nipple.
In most cases the pressure gauge has a thread 1/4" NTP, but this is really unimportant. There is no scary science to the whole thing; the only trick is to drill a hole through the air cap so that the gauge will properly read the atomizing air pressure.
When measuring the atomizing air pressure at the cap of an HVLP spray gun, it is critical that the orifice of the air cap is the same as the orifice of the cap which is used under production conditions.
In one instance, an environmental manager purchased a Size #12 cap/pressure gauge assembly. As it happened, the painters were using a Size #14 cap. What effect does this have on compliance or on production?
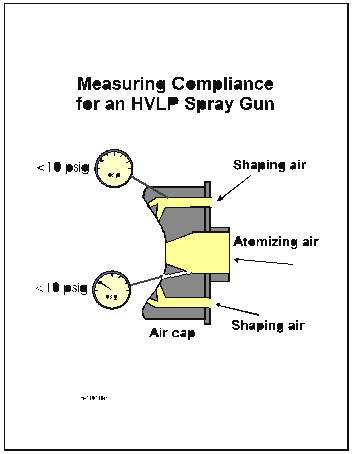
Consider the two figures below:


To measure compliance the air pressure at the handle of the HVLP gun was increased until the pressure on the Size #12 test cap was 10 psi. Thereafter, the test cap and pressure gauge assembly was removed, and replaced by the Size #14 working cap. Because the orifice of the Size #12 cap was smaller, the atomizing air pressure on the Size #14 cap was no longer 10 psi, but somewhat lower. Hence, although the painters were under the impression that they were using the maximum allowable air pressure, they were actually atomizing the coating at a lower pressure and might have compromised the coating finish, typically getting an orange peel effect.
Supposed the reverse had occurred and the environmental manager had purchased the Size #14 cap/assembly.
In this case, when the painters replaced the Size #14 test cap with their Size #12 working cap the atomizing pressure would exceed 10 psi and they would be in violation of the regulation for HVLP guns.
There are many sources for air pressure gauges, such as McMaster Carr, etc., and gauges usually cost less than $20.00
Back to finishing.com Home Page ![]()