
Curated with aloha by
Ted Mooney, P.E. RET

The authoritative public forum
for Metal Finishing 1989-2025

-----
Dye "blobs" sticking to aluminum (in part holes and titanium/aluminum interfaces)
January 23, 2015
Q. I am in the process of starting up a standard type II anodizing line for the first time after putting well over a year into setting everything up and learning the basics and not so basics. We feel that we have a handle on most of the issues but one keeps perplexing us. We are hoping to dye at room temperature but just for longer periods of time (60 minutes instead of 5 - 10). Our problem though has been dye "solubility" on certain colors but not others.
We keep seeing certain colors "blob up" on us. We started our dye tests by first adding purple (Violet E-3D) into a bath of room temperature DI water and and performed testing with that color and noticed no issues. Parts took color very well and no blobs were apparent. So we figured we could simply add other colors as dry powder to room temperature DI water.
So we then proceeded to add the red (Fiery Red E-L) and black (E-CRO) dye powder into room temperature DI water. Once it was mixed up, we started dying parts. The interface where the titanium racks clipped onto the parts started to..... collect? for lack of a better term these dye blobs in both red and black. We have added an 80 mesh filter and a 1 HP recirculating pump and ran it for hours and are not collecting any clumps of dye but they are not going away either. We have tried heating the tanks up to 140F and still see no improvement. You can see in these photos that the dyes seems to clump up on unanodized, raw aluminum that we use on our titanium tank heater. We can rub them off with our fingers but even taking them to boiling does not cause them to "dissolve" back into even DI water.
What are we doing wrong? We see these blobs form at room temperatures, we see them at 140 °F. Our other colors do not exhibit this problem at all, even at room temperature. When we first added the red and black dyes, the dye had this sort of shimmery effect almost as if it was not mixed up or it had layers that had not mixed. But after heating the two respective tanks up to 140 °F, the black turned from a brown color with lots of swirling layers to a black color with few to no layers and the red turned from a shimmery set of layers to a translucent, consistent red color. But the blobs continue to form! They make it through an 80 mesh filter so the best we can tell is that they are forming inside our tank when we are dying our parts.
When we seal the parts, these blobs stay intact through the sealing process. We can manually rub them off after dying but they turn into raw dye and they also tend to cause many parts to be reject parts because they cause discoloring around the holes. The blobs do not form (or stay) in holes without clips and they do not form on the surface of our aluminum parts.
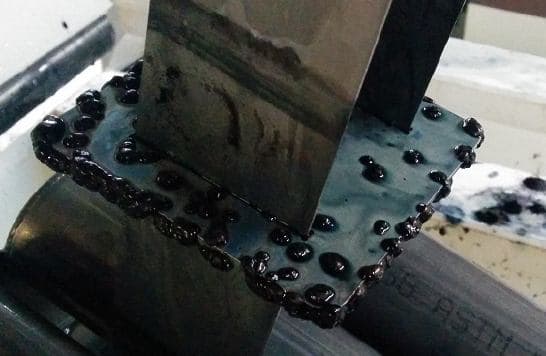
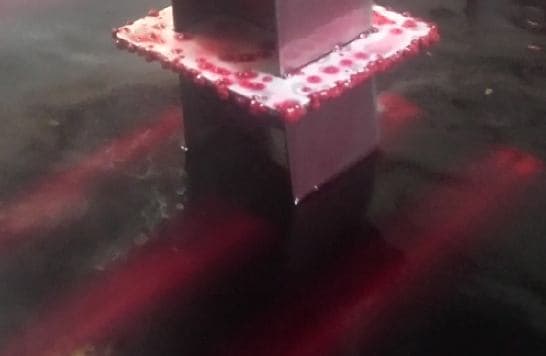
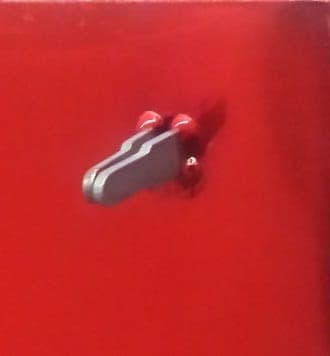
Please take a moment to look at the photos we took to better illustrate this issue. Has anybody encountered anything like this before? Thank you in advance for your suggestions.
James Holder- Las Vegas, Nevada
Treatment &
Finishing of
Aluminium and
Its Alloys"
by Wernick, Pinner
& Sheasby
(note: this book is two volumes)
on eBay or
AbeBooks
or Amazon
(affil links)
A. Hi James. Experimentation is good and an important component of progress. But when you find that those three dyes, which were formulated for minimum temperatures of 110 through 130 °F, don't work at room temperature ... the first required fix is probably to operate them at the temperature they were designed for. Anodizing dyes are not as simple as we might first think. Further, the extended immersion times may be problematical.
Still, I think I'd suggest poor rinsing, not the dye itself, as the main culprit. Wernick, Pinner & Sheasby says: "In practice an initial rinse in a relatively acid rinse bath ... followed by rinsing in a more neutral bath ... will ensure that gelatinous aluminum hydroxide is not precipitated in the film ..."
Regards,

Ted Mooney, P.E.
Striving to live Aloha
finishing.com - Pine Beach, New Jersey
January 29, 2015
A. Hi.
Wow....and I thought I have seen it all... Room temperature dyeing and elevated temperature dyeing are common. Higher temperature dyeing offers faster speed of dyeing but are more difficult to strip.
Since other colors are not an issue, except red and black, I would try ....1. A new batch of red and black dye 2. A new batch of red and black from another brand or supplier. Good luck.
- Penang Malaysia
January 29, 2015
A. James
You might be seeing the effects of galvanic action. Try using an aluminum (no submerged titanium) rack and see if you get the same results.
- Colorado Springs, Colorado
A. This is a new one on me as well. I think Willie is on the right track. Make sure your rack is electrically insulated from the dye tank, as well.

Marc Green
anodizer - Boise, Idaho
January 31, 2015
January 30, 2015
Q. We considered that we were "out of spec" and needed to try the manufacturer recommendations to see if that fixed it and go from there. Again though, we dye plenty of other colors at room temperature for 60 minutes without this issue at all, it is just the red and black that are at issue.
We see these blobs if we dye both at room temperature and at 140 °F. They have been improving (declining in frequency) since we heated our black and red tanks up and circulated them through filters but we have not seen them disappear and the blobs are forming rather than being filtered out because the filters show no blobs being caught. Our next step is to see if they form over time or quickly once in the dye.
Also, we sometimes see them less frequently when we are racking thinner parts, say 0.035" and more if we rack 0.25" parts.
We can try aluminum racks but that defeats the purpose of all of the titanium racks we have, not needing to strip them and replace them after they wear out. It might help us understand why it is happening if it is a galvanic effect though. My guess is the blobs form on the aluminum racking, just like they form on the aluminum parts. They formed on the unanodized bare aluminum parts on our otherwise titanium heater as well as on our post anodize parts, where there are any crevices or clips.
- Las Vegas, Nevada USA
February 13, 2015
Q. Can you elaborate on what you mean by galvanic action? Why is it that many companies use titanium without problems like this everyday? We have a grounded recirculation pump that's connected to the tank but that's it. We will test racking the parts onto plastic or aluminum racks and then dye the parts and see if that changes anything.
Can't galvanic action be caused simply by dissimilar metals in contact in an electrochemical bath? Sort of like a lemon clock, no ground needed?
If it's galvanic effects, well we still need electrical contact during anodizing and aluminum racks really are not an option. So, derack every part after anodizing and then rack onto plastic or aluminum parts for dying and sealing? Parts come out of the anodize counterflow rinse looking pristine and don't exhibit this at all unless they go into just these two colors. Other colors look fantastic.
- Las Vegas, Nevada
February 16, 2015
A. James
The galvanic action comes from 2 dissimilar metals in an aqueous solution. The trial with the aluminum rack is more diagnostic than a long term solution. Use it to help find root cause; does titanium contribute to the problem?
Aluminum Alloy selection can be a factor. Are all of the parts you are processing the same alloy? Is the material clad?
Is your tank metal or plastic? If plastic, ground the solution, otherwise the tank.
Some folks use sacrificial anodes to counter galvanic action. Hang a piece of bare magnesium in the dye bath with your parts. We found that hanging both the rack and anode on the same metal bar yielded better results.
- Colorado Springs, Colorado
February 16, 2015
Q. Titanium not only contributes, it causes it. If we don't use titanium, they don't form. But then we can't use our racking.
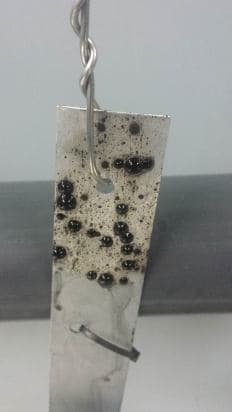
Raw materials to be anodized are 5000 and 6000 series only. Not clad. Sheets and coils. Tanks are plastic and are grounded by virtue of the recirculating eductor pumps we place in the dye tanks. We have tested this in a cup with titanium clips attached to the parts (which causes this) and without (which does not).
Our next step to try is sacrificial anodes. We were going to attach them directly to our titanium racks.
Why have we never heard of this before? Only certain colors are affected but surely this isn't a new problem for industry? We tried another manufacturer's black and red today in a cup trial and it too blobbed up. We tried our purple, blue, yellow and orange and they just don't. Even if you apply artificial voltage to them.
To create this, we took a piece of aluminum out of our vibratory finisher, took it to an aluminum oxide drum sander and selectively sanded parts of it, rinsed it in DI water, clipped a titanium clip onto it and placed it literally in a cup of dye at 10 grams per liter of black in this case.
That's all it takes to cause this. They start to form in a few minutes and get worse and worse until reaching a point where they are blobbing everywhere we hit with the sander. They form if our dye tanks are recirculating or not. They form at room temperature and 140 °F. We don't even need to caustic etch or put these in acid or even apply voltage at all to them or anything. There's a nice line between where the raw aluminum was exposed (where they form) and parts with natural oxide coating that causes the blobs not to form there. Obviously though, we have to have raw aluminum when we anodize so that isn't a solution.
How long does the magnesium last? How much of a surface area does one need to add vs titanium rack size? Can they be left on and go through caustic and anodize tanks or would that be a bad idea?
Attached is a part that we processed in a cup. No acid at all. No caustic. Just raw aluminum plus a sanding belt and put in a cup with a titanium clip attached. This is after the counterflow rinse. Those blobs are tenacious and do not rinse off, instead requiring mechanical force to remove. They also leave marks on the parts where they form and also tend to aggregate in any nooks or crannies or spots where we clip parts to racks.
James Holder [returning]- Las Vegas, Nevada
February 18, 2015
A. James
At a previous shop, we had 6' long tanks, 4' deep. For each bar that spanned the 6', we had one 36" long x 1" diameter magnesium rod suspended. We would mechanically clean with scotchbrite prior to use; not all jobs required its' use. The rod would last more than 1 year. Remove from the dye when not in use.
If you are not doing so already, you might play with a dilute nitric acid dip, after anodize but before the dye, to see if it yields a benefit.
Also see if your 'cup' test yields the same results using a stainless steel cup; coupon in contact with cup, and not.
- Colorado Springs, Colorado
Q, A, or Comment on THIS thread -or- Start a NEW Thread