
Curated with aloha by
Ted Mooney, P.E. RET

The authoritative public forum
for Metal Finishing 1989-2025

-----
Ra surface finish -- unit-less, microinch or micrometer
Q. So I understand RMS and Ra, but my question is since Ra is called out in both Micro-Inch and Micrometer, how do I know if on a drawing when the just have a note Ra 12.5 they are saying Micro-Inch or Micrometer? Should I assume if the drawing is in MM that the callout would then also be in Micometer?
Thanks
Quality - Hanover Pennsylvania
May 16, 2024
⇩ Related postings, oldest first ⇩
Q. Ra is the arithmetical mean roughness of a surface. Does Ra have units associated with it (i.e., inches, microns, etc.), or is it a unitless number?
David ArnoldPlastic Mfg. - Minden, Nebraska
2000
A. David:
Surface roughness values, including Ra need a dimension to be interpreted. The common unit for machining applications in the US is microinch (millionths of an inch). Metric values would be microns (millionths of a meter) or nanometer (billionths of a meter) for polished surfaces.

Larry Hanke
Minneapolis, Minnesota
A. All of the following have units of length ---
Ra: The arithmetic mean
Rq: The root mean square
Ry: Maximum peak-to-valley height
Hope this helps.

James Totter, CEF
- Tallahassee, Florida
A. The average roughness, Ra, is expressed in units of height. In the Imperial (English) system, Ra typically expressed in "millionths" of an inch. This is also referred to as "microinches" or sometimes just as "micro" (however the latter is just slang). In the metric system, Ra is typically expressed as "millionths of a meter" also called "micrometers" or "microns".
Mark Malburg, Ph.D.Chairman ASME B46.1 "Surface Texture" - Columbus, Indiana
Q. Is Ra & RMS exclusively used for measuring surface quality on metal finishes? Is there another measurement value used for measuring Roughness Average on glass mirror surface? How does Ra of metal surface compares to surface of a glass mirror?

Michael Liu Taylor
specialty stainless steel distributor - Dallas, Texas
2000
A. Hi Michael. A mirror finish on metal is about an Ra of 4 microinches or 0.1 microns. I don't know what would happen if you ran a profilometer over a smooth glass finish and am curious myself :-)
Regards,

Ted Mooney, P.E.
Striving to live Aloha
finishing.com - Pine Beach, New Jersey
Q. How large an area do you test to get the value is of Ra? How do you separate Ra from flatness?
Ian BarlowEngineer - France
July 8, 2008
Q. I need to know what is measuring equipment to measure Ra?
Zaki Yamani Ahmadengineer - Kuantan, Pahang, Malaysia
October 11, 2008
A. Hi Zaki. You would use a profilometer.
Regards,

Ted Mooney, P.E.
Striving to live Aloha
finishing.com - Pine Beach, New Jersey
August 2016
Q. Need help!
I've got this statement from one journal I've read.
'rough surface decrease Ra value while on smooth surface, Ra value increase'.
Is it right? Or it works the opposite way?
Thanks for helping, anyone.
- Johor, Malaysia
December 9, 2008
A. No, Lia. That is incorrect information, it works the opposite way. Ra 125 is rougher than Ra 32. However, for grit size it works the opposite direction: the higher the grit number, the finer the grit and the finer finish it can produce.
Regards,

Ted Mooney, P.E.
Striving to live Aloha
finishing.com - Pine Beach, New Jersey
Q. We are cutting a sprocket type gear on hobbing machine(Generating process) with the axial feed ... in this case to check the surface finish value (Ra), whether we should check along the feed direction? or across the feed direction?
Kiran Gadagapplication engineer - Bangalore, India
July 17, 2009
Q. I have a drawing of a plastic-moulded part with a minimum, as well as, a maximum, Ra tolerance for the surface finish. The surface in question, seal on an 'o' ring, to prevent fluid leakage. Is there any reason why I would not want less than the minimum Ra (0.2 in this case)?
Gary Spring- Basildon, Essex, UK
September 15, 2010
A. Gary Spring,
I would imagine as your part was a moulding the designer would spec a min and max Ra either for aesthetic purposes or to reduce manufacturing costs. The lower the Ra the more processing will be required; i.e., a mirror finish will be more expensive than a good commercial polish.
Steve.
- UK
March 12, 2011
Q. Hello,
Please tell me information of Ra roughness surface and what equipment. Also calculation to get the Ra roughness surface.
Thank you for your information.
plating worker - Kulim, Kedah, Malaysia.
December 13, 2010
Q. Dear Sir,
What is relation between Ra value we use to specified in drawing 1.6/0.8/0.4/ and micron?
Please help me in this.
Regards,
Tare
Design Dept - Vadodara,Gujrat, India
April 5, 2011
A. Hi, Tare.
A "micron" is a micrometer, one millionth of a meter.
Regards,

Ted Mooney, P.E.
Striving to live Aloha
finishing.com - Pine Beach, New Jersey
Q. If I hone a cylinder to 7.880" ± .001 and it calls for a 20-30 RA finish how do I measure this to know that I have achieved the finish spec'ed? How do I know if I have a 20 to 30 RA?
Greg WeitzelTechnician - Indianapolis, Indiana, USA
September 13, 2011
Q. Print calls for a 125Ra, the part measures 155 Ra
Is this within tolerance?
- Wilmington, Delaware, USA
November 23, 2011
A. For measuring Ra value, you could use Surface Roughness Tester; it's available in the market place.
About 125 in measuring and part has 155, it does not matter.
125 to 250 is common tolerance
- Green Bay, Wisconsin
Q. If a drawing specifies 500 micro-inch requirement, I've always been under the impression that this value would be the maximum allowed surface-roughness variation as defined by ASME B46.1. A colleague told me that this is just a target value, not a maximum. what is the convention for the surface finish callout on a drawing? What is the document that governs this? I couldn't specifically determine the interpretation of this per ANSI B46.1? Let me know.
Dave JohnsonAerospace/Military - Clinton, Utah, USA
November 28, 2011
A. I can't say what the drawing intent for your specific customer is, only my own personal experiences. If a drawing calls up a surface finish requirement it is considered to be a maximum value as far as I am concerned. I have worked on and with many of the Aerospace platforms and all drawings that I have come across have stated surface finishes as maximums (although there was one drawing that actually did the reverse and stated a minimum roughness! It was clearly marked on the drawing though).
In the end, if you are not certain what the requirement is go back to your customer and ask the question. 2 minutes on the phone may save you a lot of pain.
Aerospace - Yeovil, Somerset, UK
Q. Ex " 0.3 MICRON RA". AS IF NOW I UNDERSTAND, RA IS THE UNIT THAT SHOWS ARITHMETIC MEAN OF THE SURFACE FINISH THAT ARE MEASURED FROM FLAT SURFACE RANDOMLY .
ADITHYASJ NAIR- MUMBAI, MAHARASHTRA
December 17, 2011
Q. Dear sir, I want to know what is the tooth surface roughness unit if I measure it with digital microscope? Microns or other?
Thank you for your kindness.
- Yogya, Indonesia
October 4, 2013
Length of Travel and Cutoff Length Settings on Profilometers
Q. I work in quality and lately have been thinking if the settings for 'LT' (Length of Travel) and 'LC' (Cutoff length) on a profilometer should be considered when measuring a particular range of 'RA' surface finishes? We generally grind and/or super polish from 2 RA to 8 RA. I'd appreciate your thoughts.
Paul DeskoQuality - Torrington, Connecticut, USA
February 7, 2014
A. You might have something that could help others. The length could be taken into consideration as part of the overall reading. Meaning if the part was say 3 inches and got a reading of 6Ra and you were only able to measure half that length for whatever reason, you could indicate that as Ra6@50. I'm not sure that would make a lot of difference in the overall reading but it would give the observer more reliability of the quality.

AF Kenton
retired business owner - Hatboro, Pennsylvania
Q. I guess I wasn't clear in my explanation of what I was in search of. My goal was to understand if I should be using a different 'length of travel' and/or 'cut-off length' when our surface finishes require a 2RA "instead of" an 8 RA or above. Maybe that will make my question clearer. Thanks in advance.
Paul Desko [returning]Quality - Torrington, Connecticut, USA
February 17, 2014
A. The English language is a SOB sometimes. OK let me see if I understand what you are looking for. The length of the part is one thing. the length of the profilometer stroke is another, the reading of the surface finish is the 3rd thing. So if I understand this right, you are requesting info on the difference between the RA's in which case, the lower the number the smoother the surface finish. I don't think you are talking about different measurement scales, are you?

AF Kenton
retired business owner - Hatboro, Pennsylvania
Q. Profilometers have various "cut-off Lengths" (Lc), such as .003, .01, .03 etc... Should this be changed when different 'RA's' are called for, such as a 16RA, 8RA or a 2RA? Again thank you for your time.
Paul Desko [returning]Quality - Torrington, Connecticut, USA
February 20, 2014
A. Never looked at this question the way you are doing. OK. #1 A profilometer measures the surface roughness of any part. It is an average of the surface the stylus travels. #2 It can not do anything about the number because that is the roughness of the part or the section that was read with the profilometer. The number only indicates to the end user how smooth or how much more work has to be done to the part to get it into an acceptable surface finish to either paint, plate, or leave it. In the medical industry, the smoother finish or lower number is desirable to reduce the possibility of bacteria adhering to the part when in use.

AF Kenton
retired business owner - Hatboro, Pennsylvania
February 21, 2014
A. Hi Paul. The advances in surface topography over the course of my career make my head spin, with terms that were unheard of or at least completely ignored years ago now becoming critical as we continue towards miniaturization. So I needed a 15-minute refresher on this Lc and Ls issue. I'm talking myself through this -- I'm sure you know much more about the topic than I do.
In brief, in addition to the local roughness of a surface, it also may have a long wavelength waviness. For example, we can picture a football field where the Astroturf may have a particular roughness that we measure and are careful about so cleats grab but players' skin doesn't -- but the field may have a bit of ponding at the left hashmark on the 20-yard line that we may not notice and which doesn't matter and which may even inject a serendipity that fans demand. So we don't study every square inch of the whole field, just a little patch, and our long wave cutoff (Lc) may be 6 inches rather than 100 yards. This Lc we choose has more to do with functionality than with with whether Brand A artificial turf is rougher than Brand B.
Regarding Ls, the short wave cutoff, I once read that a shoreline looks generally the same regardless of magnification. So you magnify the picture a hundred times and you still see the same level of graininess. Magnify the picture of that short section a hundred times and you still see it; do it again and you still see it. So no profilometer or other instrument that is following that shoreline is really following it, it is following it at one scale, but is jumping over the graininess at some smaller scale. The roughness/graininess below some magnification level is ignored; that's Ls.
I think the answer to your question is that Lc must be specified on the basis of functionality -- what really matters. You are specifying an Ra in the first place because it impacts the functionality of the part. The instrument can't tell the function of the part and why Lc matters, but the designer can. As a practical matter, I'd assume that the larger the machined area, usually the higher the Lc.
Ls is conventionally specified as 1/100 of Lc. Good luck.
Regards,

Ted Mooney, P.E.
Striving to live Aloha
finishing.com - Pine Beach, New Jersey
February 2014
Q. So then, how does 'Lt' or length of travel, of the profilometer factor into this equation? The cylinders that we grind are as small as 3" in dia. x 30" long up to 59" in dia" and up to 400" long! Our customers do not specify any Lc or Lt, so it is left up to us to decide what is best for them. Thanks again!
Paul Desko [returning]Quality - Torrington, Connecticut, USA
February 24, 2014
A. As I say, this whole idea of Lc and Ls is a bit foreign to my career experience, and it may be the same with others. But actually ISO 1302-2002 says that the drawings are supposed to specify Lc and Ls.
But if the designer doesn't specify them, no, it is NOT up to you to decide what is best for them -- because you are not in a position to hazard guesses about what a designer is contending against. So I guess you say that in the absence of contrary info, mid range readings are usually best, so that's how you pick Lc on your profilometer and that's that :-)
As for Lt, I keep seeing different definitions for that, some claiming Lt = Lc, some saying the profile is evaluated 5x, so Lt = 5 x Lc plus pretravel and post travel. I think you have to refer to the operating instructions for your profilometer to determine exactly what it means to the instrument you are using, but that you should pick the middle of the range for Lc. Sorry, I can't take it any further because going further would imply an expertise I don't have :-(
Regards,

Ted Mooney, P.E.
Striving to live Aloha
finishing.com - Pine Beach, New Jersey
A. Just some additional thoughts. If you did not talk with your customer about this issue, make sure you document what you did do and show support information.

AF Kenton
retired business owner - Hatboro, Pennsylvania
February 25, 2014
Q. I am reviewing a drawing that calls out a surface roughness of Ra 16 Min. How would you interpret this callout? I have seen "MAX" call outs, but never "Min". Also is there a specification that defines how to use "Max" and "Min"?
Jose Supan- Conshohocken, Pennsylvania, USA
February 25, 2015
A. It is a little strange that they should use terminology min; however,I think you should check with your customer. As good customer relations, I'd inform him that technically you do not have to do anything to the part for you to conform to his requirement except bill him for nothing unless the parts are way under his referenced specs. in which case you have to make them rougher.

AF Kenton
retired business owner - Hatboro, Pennsylvania
March 3, 2015
A. Hello, regarding the Ra min, I have seen it scarcely but it is quite common on bore with press fit operations; per say I have a bore where we press a seal and we need the Ra to range from 0.8 min to 2.5 max; smoother surface than specified would cause the seal to move from position, higher than specified would cause damage to the seal for the friction during the press in operation.
We honestly make it reader friendly by stating: Ra 0.8 - 2.5.
And that is that... so yes, you have to be careful sometimes with smoother than expected surfaces.
- El Paso Texas USA
March 4, 2015
Q. Can you help me understand this call out:
8Ra, Rmr (bearing ratio) 50-70%, Rsk negative skew ratio
- Watertown South Dakota USA
March 17, 2015
Dear sir,
my question is how to measure Ra value and what is exact unit.
What is difference between Ra value 0.3 or Ra value 8
- pune , Maharashtra India
August 20, 2016
A. Hi parmeshwar. As I'm sure that you can appreciate, surface roughness can be a rather involved issue. Consider: is sandpaper smoother or rougher than a splintered wooden boardwalk? Looking from a good distance the wood boardwalk, with its divots and missing chunks of wood and long splinters is much rougher than the sandpaper, whose roughness you probably can't even see from 10 feet away. But up close, the wooden boardwalk will have slick spots of smooth polished wood that you can slip on, whereas the sandpaper will look and feel very rough. So there really isn't an answer to the question of which is rougher until you carefully define the roughness that you want to consider and measure.
Ra is one of many ways of looking at and ranking roughness, and you need to apply your mind to understand what it means, but there are pictures and explanations at www.wisetool.com/surfacefinish.htm and many other websites.
Ra is measured with an instrument called a profilometer which has a tiny needle or laser which tracks the surface and does the math to tell you the Ra of the surface.
Ra is measured in millimeters (or in microinches in the US system). People can't tell you the difference between Ra of 0.3 and Ra of 8 until you tell them whether the readings are in millimeters or microinches ... but Ra 0.3 millimeters would equal about Ra 12 microinches.
Regards,

Ted Mooney, P.E. RET
Striving to live Aloha
finishing.com - Pine Beach, New Jersey
Dwg. says Ra6.3; we did Ra1.6 -- is it okay?
Q. Dear All: I wanted to understand a bit on machining surface finish. Sketch calls for Ra6.3. Actual achieved is 1.6 on CNC. Should we interpret Ra6.3 as max or min. There is no range specified. Kindly advise
Dinesh Bajaj- Delhi, India
October 21, 2016
A. Hi Dinesh. Brian Terry answered that question above. Good luck.
Regards,

Ted Mooney, P.E. RET
Striving to live Aloha
finishing.com - Pine Beach, New Jersey
Q. I have just purchased a surface finishing tester and need to understand what the Ra reading is telling me in microns. For instance if I have a 0.6Ra finish that requires taking down to 0.4Ra, How many microns of metal will I be removing and what will the finish micron be ?
Is there a chart I can use as I seem to see loads of varying information?
Engineer - UK
September 10, 2018
A. Hi Kevin. Surface roughness is a topic that is sufficiently complicated that quick answers seem to muddy the water instead of clarifying it. Speaking for myself I always have to spend 20 minutes refreshing my memory before I can say anything; so let's try this ...
Ra is the most widely used measure of surface roughness. The needle or laser on your instrument tracks the profile rather like a hiker, let's call him "our a", traversing the peaks and valleys of a trail. He can tell us that trail 0.6Ra is less rough than 0.8Ra, but rougher than trail 0.4Ra. But if you ask "our a" hiker to explain precisely what he means, he can't do it without using definitions & vocabulary. Thus Ra = arithmetical mean deviation or ![]() .
.
To hiker "our a", a trail with three 200-foot peaks is exactly as rough as a trail with one 400-foot peak and two 100-foot peaks. But if you now set your tester to a different scale, say Rq, the new hiker "our q" may sort of agree with "our a" about the relative difficulty of various trails, but he won't agree exactly. The tallest peaks and deepest troughs of the trail concern "our q" far more than their median height (perhaps he is less skillful at rock climbing than "our a"). He rates the difficulty of the trails not by the average elevation changes from troughs to peaks but by the square of that elevation change. To "our q", the trail with the 400-foot peak and two 100-foot peaks is much rougher than the one with three 200-foot peaks. And Ra & Rq are not the only surface roughness scales.
I think your question about how much material removal is necessary to get from 0.6Ra to 0.4Ra is unanswerable. If your hikers start shoveling away the highest peaks, throwing the fill into the troughs, they'll get to a smoother path quicker than if you tell them to put the fill in a dump truck for carting away, leaving the troughs unfilled. Similarly, burnishing (squashing the peaks down into the troughs) might get you to 0.4Ra without removing any material, whereas turning might require removing quite a lot. Good luck.
Regards,

Ted Mooney, P.E. RET
Striving to live Aloha
finishing.com - Pine Beach, New Jersey
September 2018
Is this surface finish acceptable?
March 5, 2019Q. Hi, we have a product which, after nickel plating, the surface requirement is :
MAXIMUM MACHINED SURFACE - 125µin Ra
MAXIMUM SURFACE ROUGHNESS - 250µin Ra
Please find the actual surface condition in below pics:
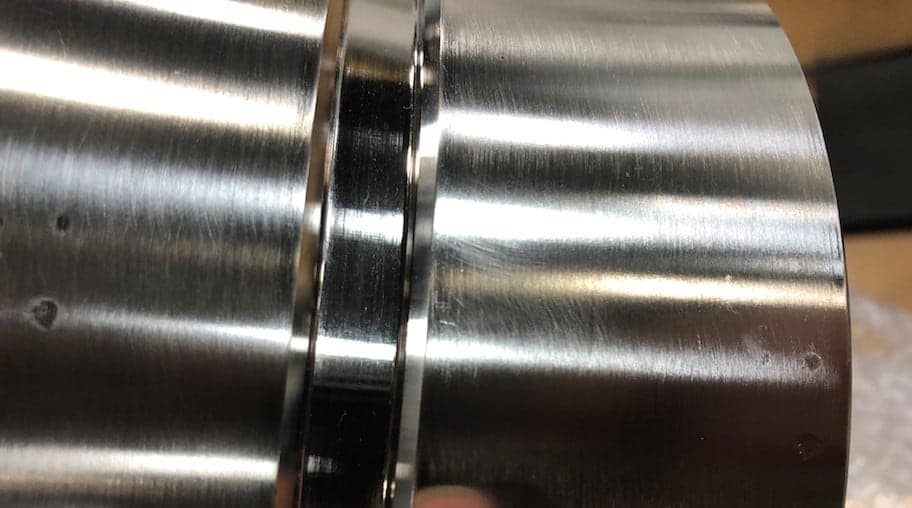
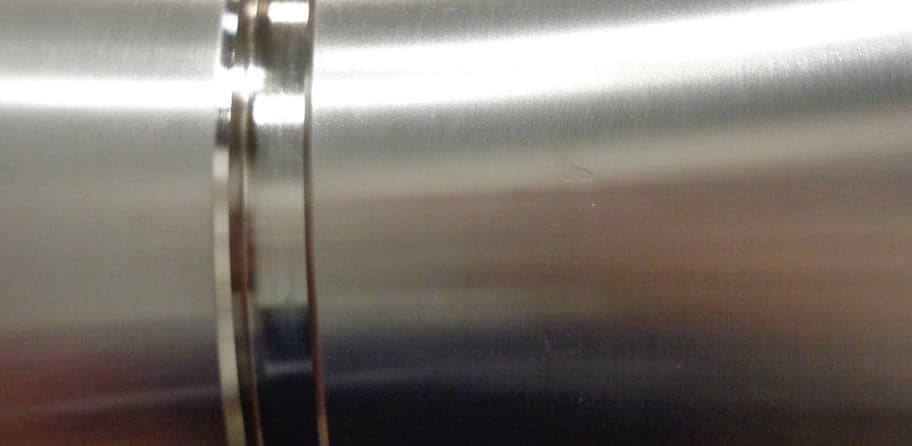
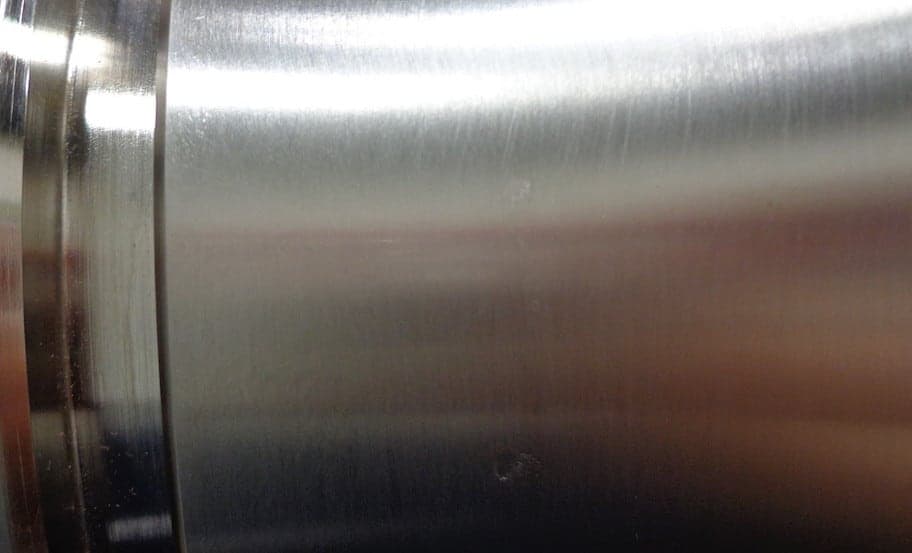
Someone told me this is acceptable, but I don't think so. Could you provide your ideas?
The imperfections were measured with calibrated measuring & test equipment and were determined to be a maximum .062" x .062"
BTW, the nickel plating seems fine after the copper sulphate
⇦ this on
eBay or
Amazon [affil links] test.
Thanks for your help.
buyer - Newington, New Hampshire (USA)
A. Hi Jing. I recently read that an artificial intelligence program demonstrated greater skill than expert dermatologists/oncologists at reading whether skin markings were melanoma or not, so I'm certainly not laughing at the idea of trying to quantify surface finishes from a photograph. But I do think we're nowhere near that point, yet, so measuring the finish with a profilometer is your only way of saying whether it complies with the spec or not.
You haven't yet said what this item is and is used for, and with no tape measure or familiar object in the picture I can't judge the scale; still I personally would find it very hard to believe that this finish, with its scratches -- and especially with its deep pits -- will prove satisfactory for its purpose.
Regards,

Ted Mooney, P.E. RET
Striving to live Aloha
finishing.com - Pine Beach, New Jersey
A. FYI The Ra's given by you for the product is considered a rough finish because normal rolled steel sheet is around 30 RMS or 120 Ra. Unless the end product is for the food or medical industry your finish is acceptable.

AF Kenton
retired business owner - Hatboro, Pennsylvania
A. Hi again. If your profilometer needle falls into any of the large potholes in the first picture, I seriously doubt that it's going to read 125 microinch or better :-)
Regards,

Ted Mooney, P.E. RET
Striving to live Aloha
finishing.com - Pine Beach, New Jersey
A. I have always measured RA by running the stylus across the entire surface of the feature (as by definition, RA is an "average" ) If imperfections are present they are included in the travel path of the profilometers' stylus. Another general rule I apply is if micro meter or micro inch is not specified, by the customer on their print, I would use micro inch if the print dimensions are in inches, and micro meters if the print dimensions are in millimeters.
Rick PapineauGreystone QA CQT 28 yrs. - Lincoln Rhode Island
September 4, 2019
Q, A, or Comment on THIS thread -or- Start a NEW Thread
