Curated with aloha by
Ted Mooney, P.E. RET

The authoritative public forum
for Metal Finishing 1989-2025

-----
Info about unusual surface roughness symbols
1999
Q. Respected Sir,
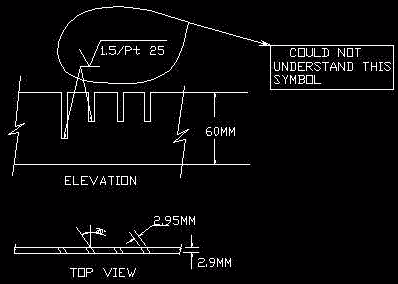
I require some detail information about the surface finish symbol shown below:

It is 2.9 MM thk. and 60 MM wide. There are slots of 2.95 MM width at an angle of 30 degrees each at a pitch of 26 MM. The dimensions are according the DIN standards. The term "1.5/Pt 25" has to be understood.
I was really happy to get some interest for my topic. Looking forward for your co-operation.
Thanking You,
Yours Sincerely,
UMANG CHAVADIAA. The American National Standard ASME Y14.36 establishes the profile for surface textures. The roughness sampling length is placed below the horizontal extension.
Bruce Solana- Panama City, Florida
2000
Q. I have a drawing of a cast steel component. One of the drawing notes contains a finishing mark I have never seen before. This mark starts with the Roman numeral III followed by the check-shaped finishing mark. The entire note reads: III(check-mark)Surface Quality per 2A 296-1004. What does this mean?
Thank you.
John Bauchat- Milford, New Hampshire, USA
2002
Q. We have a customer drawing that specifies 1.0 Finish mark, and under the mark it reads 0.4 / Rt 6.3 with a "C" under the 0.4
What do all these numbers and letters mean?
job shop employee - Jackson, Michigan
2007
Q. We have a customer drawing that specifies:
"0.9/Pt6" above the Finish mark
What do all these numbers and letters mean?
Appreciate your response.
- Singapore
March 14, 2009
Q, A, or Comment on THIS thread -or- Start a NEW Thread